Extensible 3D (X3D) encodings
Part 2: Classic VRML encoding
Annex B
(informative)
Examples
This annex provides a variety of X3D examples using the Classic VRML encoding. Table B.1 contains a table of contents that lists the topics in this clause:
Table B.1 — Topics in this annex
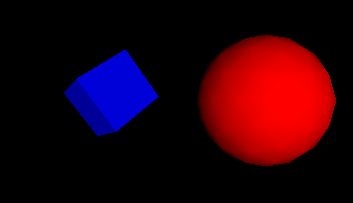
This example contains a simple scene defining a view of a red sphere and a blue box, lit by a directional light as shown in Figure B.1:
#X3D V3.0 utf8
PROFILE "Full"
META "filename" "RedSphereBlueBox.wrl"

Transform {
  children [
    NavigationInfo {
      headlight FALSE
      avatarSize [ 0.25 1.6 0.75 ]
      type [ "EXAMINE" ]
    }
    DirectionalLight {
    }
    Transform {
      translation 3.0 0.0 1.0
      children [
	Shape {
	  geometry Sphere { radius 2.3
	  }
	  appearance Appearance {
	    material Material { diffuseColor 1.0 0.0 0.0
	    }
	  }
	}
      ]
    }
    Transform {
      translation -2.4 0.2 1.0
      rotation 0.0 0.707 0.707 0.9
      children [
	Shape {
	  geometry Box {
	  }
	  appearance Appearance {
	    material Material { diffuseColor 0.0 0.0 1.0
	    }
	  }
	}
      ]
    }
  ]
}
Click here to view this example in a 3D scene window.
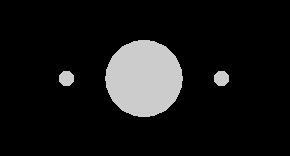
Reading the following file results in three spheres being drawn. The first sphere defines a unit sphere at the origin. The second sphere, named "Joe", defines a smaller sphere translated along the +x axis, the third sphere is a reference to the second sphere and is translated along the -x axis. If any changes occur to the second sphere (e.g. radius changes), the third sphere will change to the picture shown in Figure B.2:
#X3D V3.0 utf8
PROFILE "Full"
META "filename" "Instancing.wrl"

Transform {
  children [
    Shape {
      geometry Sphere {
      }
    }
    Transform {
      translation 2.0 0.0 0.0
      children [
	DEF Joe Shape {
	  geometry Sphere { radius 0.2
	  }
	}
      ]
    }
    Transform {
      translation -2.0 0.0 0.0
      children [
	USE Joe
      ]
    }
  ]
}
Click here to view this example in a 3D scene window.
(Note that the spheres are unlit because no appearance was specified.)
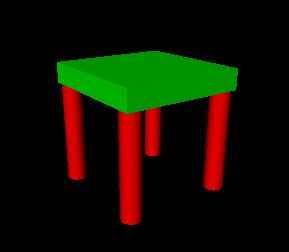
A simple table with variable colours for the legs and top might be prototyped as:
#X3D V3.0 utf8
PROFILE "Full"
META "filename" "Prototype.wrl"

PROTO TwoColorTable [
  field SFColor legColor .8 .4 .7
  field SFColor topColor .6 .6 .1
] {
  Transform {
    children [
      Transform { translation 0.0 0.6 0.0
        children [
          Shape {
            appearance Appearance {
              material DEF TableTopMaterial Material {
                diffuseColor IS topColor
             }
            }
            geometry Box { size 1.2 0.2 1.2
            }
          }
        ]
      }
      Transform { translation -0.5 0.0 -0.5
        children [
          DEF Leg Shape {
            appearance Appearance {
              material DEF LegMaterial Material {
                diffuseColor 1.0 0.0 0.0
                diffuseColor IS legColor
              }
            }
            geometry Cylinder { height 1.0 radius 0.1
            }
          }
        ]
      }
      Transform { translation 0.5 0.0 -0.5
        children [
          USE Leg
        ]
      }
      Transform { translation -0.5 0.0 0.5
        children [
          USE Leg
        ]
      }
      Transform { translation 0.5 0.0 0.5
        children [
          USE Leg
        ]
      }
    ]
  }
  # End of root Transform
}
# End of prototype
# The prototype is now defined. Although it contains a
# number of nodes, only the legColor and topColor fields
# are public. Instead of using the default legColor and
# topColor, this instance of the table has red legs and
# a green top:
TwoColorTable {
  legColor 1 0 0
  topColor 0 1 0
}
NavigationInfo {
  type [ "EXAMINE" ] # Use the Examine viewer
}
Click here to view this example in a 3D scene window.
This Script node decides whether or not to open a bank vault given openVault and combinationEntered messages. To do this, it remembers whether or not the correct combination has been entereB. The Script node combined with a Sphere, a TouchSensor and a Sound node to show how is works. When the pointing device is over the sphere, the combinationEntered eventIn of the Script is sent. Then, when the Sphere is touched (typically when the mouse button is pressed) the Script is sent the openVault eventIn. This generates the vaultUnlocked eventOut which starts a 'click' sounB. Here is the example:
#X3D V3.0 utf8
PROFILE "Full"
MRTA "filename" "Scripting.wrl"

DEF OpenVault Script {
  # field tags are declarations of what interfaces are in this Script node
  eventIn  SFTime openVault
  eventIn  SFBool combinationEntered
  eventOut SFTime vaultUnlocked
  field    SFBool unlocked FALSE
  url [ "ecmascript:
  function combinationEntered (value) {
    unlocked = value;
  }
  function openVault(value) {
    if (unlocked) vaultUnlocked = value;
  }
  " ]
}
Shape {
  appearance Appearance {
    material Material { diffuseColor 1 0 0 }
  }
  geometry Sphere { }
}
Sound {
  maxBack 1000
  maxFront 1000
  minBack 1000
  minFront 1000
  source DEF Click AudioClip {
    stopTime 1 url [ "click.wav" ]
  }
}
DEF TS TouchSensor {
}
ROUTE TS.isOver TO OpenVault.combinationEntered
ROUTE TS.touchTime TO OpenVault.openVault
ROUTE OpenVault.vaultUnlocked TO Click.startTime
Note that the openVault eventIn and the vaultUnlocked eventOut are of type SFTime, which allows them to be wired directly to a TouchSensor or TimeSensor.
Click here to view this example in a 3D scene window.
The following IndexedFaceSet (contained in a Shape node) uses all four of the geometric property nodes to specify vertex coordinates, colours per vertex, normals per vertex, and texture coordinates per vertex (note that the material sets the overall transparency):
#X3D V3.0 utf8
PROFILE "Full"
META "filename" "GeometricProperties.wrl"

Shape {
  geometry IndexedFaceSet {
    coordIndex [ 0, 1, 3, -1, 0, 2, 3, -1 ]
    coord Coordinate {
      point [ 0 0 0, 1 0 0, 1 0 -1, 0.5 1 0 ]
    }
    color Color {
      color [ 0.2 0.7 0.8, 0.5 0 0, 0.1 0.8 0.1, 0 0 0.7 ]
    }
    normal Normal {
      vector [ 0 0 1, 0 0 1, 0 0 1, 0 0 1 ]
    }
    texCoord TextureCoordinate {
      point [ 0 0, 1 0, 1 0.4, 1 1 ]
    }
  }
  appearance Appearance {
    material Material { transparency 0.5 }
    texture PixelTexture { image 2 2 1 0xFF 0x80 0x80 0xFF }
  }
}
Click here to view this example in a 3D scene window.
X3D has the capability to define new nodes. The following is an
example of a new node RefractiveMaterial. This node behaves as a Material node
with an added field, indexOfRefraction. The list of URLs for the
EXTERNPROTO are searched in order. If the browser recognizes the URN,
urn:inet:foo.com:types:RefractiveMaterial, it may treat it
as a native type (or load the implementation). Otherwise, the URL,
http://www.myCompany.com/vrmlNodes/RefractiveMaterial.wrl,
is used as a backup to ensure that the node is supported on any browsers. See
below for the PROTO implementation that treats RefractiveMaterial as a Material
(and ignores the refractiveIndex field).
#X3D V3.0 utf8
PROFILE "Full"
META "filename" "PrototypesPlus.wrl"

# external protype definition
EXTERNPROTO RefractiveMaterial [
  # field tags are declarations of what interfaces are in this Proto node
  exposedField SFFloat ambientIntensity
  exposedField SFColor diffuseColor
  exposedField SFColor specularColor
  exposedField SFColor emissiveColor
  exposedField SFFloat shininess
  exposedField SFFloat transparency
  exposedField SFFloat indexOfRefraction
][
  "urn:inet:foo.com:types:RefractiveMaterial"
  "http://www.myCompany.com/vrmlNodes/RefractiveMaterial.wrl"
  "RefractiveMaterial.wrl"
]
Shape {
  geometry Sphere { }
  appearance Appearance {
    material RefractiveMaterial {
      ambientIntensity 0.2
      diffuseColor 1 0 0
      indexOfRefraction 0.3
    }
  }
}
The URL http://www.myCompany.com/X3DNodes/RefractiveMaterial.wrl
contains the following:
#X3D V3.0 utf8
PROFILE "Full"
META "filename" "RefractiveMaterial.wrl"

# external protype definition
PROTO RefractiveMaterial [       # Prototype definition
  exposedField SFFloat ambientIntensity 0
  exposedField SFColor diffuseColor 0.5 0.5 0.5
  exposedField SFColor specularColor 0 0 0
  exposedField SFColor emissiveColor 0 0 0
  exposedField SFFloat shininess 0
  exposedField SFFloat transparency 0
  exposedField SFFloat indexOfRefraction 0.1
]
{
    Material {
        ambientIntensity IS ambientIntensity
        diffuseColor     IS diffuseColor
        specularColor    IS specularColor
        emissiveColor    IS emissiveColor
        shininess        IS shininess
        transparency     IS transparency
    }
}
Note that the name of the new node type, RefractiveMaterial, is not used by the browser to decide if the node is native or not; the URL/URN names determine the node's implementation.
Click here to view this example in a 3D scene window.
The target parameter can be used by the anchor node to send a request to load a URL into another frame:
Anchor {
  url "http://somehost/somefile.html"
  parameter [ "target=name_of_frame" ]
  children Shape { geometry Cylinder {} }
}
An Anchor may be used to bind the viewer to a particular viewpoint in a virtual world by specifying a URL ending with #viewpointName, where viewpointName is the DEF name of a viewpoint defined in the worlB. For example:
Anchor {
  url "http://www.school.edu/X3D/someScene.wrl#OverView"
  children Shape { geometry Box {} }
}
specifies an anchor that puts the viewer in the someScene world bound to the viewpoint named OverView when the box is chosen (note that OverView is the DEF name of the viewpoint, not the value of the viewpoint's description field).
If no world is specified, the current scene is implieB. For example:
Anchor {
  url "#Doorway"
  children Shape { geometry Sphere {} }
}
binds the user's view to the viewpoint with the DEF name Doorway in the current scene.
A directional light source illuminates only the objects in its enclosing grouping node. The light illuminates everything within this coordinate system including the objects that precede it in the scene graph as shown below:
#X3D V3.0 utf8
PROFILE "Full"
META "filename" "DirectionalLight.wrl"

Group {
  children [
    DEF UnlitShapeOne Transform {
      translation -3.0 0.0 0.0
      children [
        Shape {
          geometry Box { }
          appearance DEF App Appearance {
            material Material {
              diffuseColor 0.8 0.4 0.2
            }
          }
        }
      ]
    }
    DEF LitParent Group {
      children [
        DEF LitShapeOne Transform { translation 0.0 2.0 0.0
          children [
            Shape {
              geometry Sphere { }
              appearance USE App
            }
          ]
        }
        DirectionalLight {
        }
        DEF LitShapeTwo Transform {
          translation 0.0 -2.0 0.0
          children [
            Shape {
              geometry Cylinder { }
              appearance USE App
            }
          ]
        }
      ]
    }
    DEF UnlitShapeTwo Transform {
      translation 3.0 0.0 0.0
      children [
        Shape {
          geometry Cone { }
          appearance USE App
        }
      ]
    }
  ]
}
Click here to view this example in a 3D scene window.
This simple example defines a PointSet composed of 3 points. The first point is red (1 0 0), the second point is green (0 1 0), and the third point is blue (0 0 1). The second PointSet instances the Coordinate node defined in the first PointSet, but defines different colours:
#X3D V3.0 utf8
PROFILE "Full"
META "filename" "PointSet.wrl"

Shape {
  geometry PointSet {
    color Color { color [ 1.0 0.0 0.0 ] }
    coord DEF mypts Coordinate {
      point [ 0.0 0.0 0.0, 2.0 2.0 2.0, 3.0 3.0 3.0 ]
    }
  }
}
Transform {
  translation 2.0 0.0 0.0
  children [
    Shape {
      geometry PointSet {
	color Color { color [ 0.5 0.5 0.0 ] }
	coord USE mypts
      }
    }
  ]
}
Click here to view this example in a 3D scene window.
The LOD node is typically used for switching between different versions of geometry at specified distances from the viewer. However, if the range field is left at its default value, the browser selects the most appropriate child from the list given. It can make this selection based on performance or perceived importance of the object. Children should be listed with most detailed version first just as for the normal case. This "performance LOD" feature can be combined with the normal LOD function to give the browser a selection of children from which to choose at each distance.
In this example, the scence consists of a small reference sphere and an LOD node which has two ranges and three children. The browser is free to choose from three Shape choices representing either a detailed or a less-detailed version of the object when the viewer is closer than 10 meters (as measured in the coordinate space of the LOD). The browser should display the less detailed version of the object (box) if the viewer is between 10 and 50 metres, the sphere when closer than 10 metres and should display nothing, the empty Shape last child, if the viewer is farther than 50 meters. Browsers should try to honor the hints given by authors, and authors should try to give browsers as much freedom as they can to choose levels of detail based on performance.
#X3D V3.0 utf8
PROFILE "Full"
META "filename" "LevelOfDetail.wrl"

Viewpoint { position 0 0 25 description "Start"}

LOD {
  range [ "10.0" "50.0" ]
  children [
    Shape {
      geometry Sphere { }
    }
    Shape {
      geometry Box { }
    }
    Shape { }
  ]
}
For best results, ranges should be specified only where necessary and LOD nodes should be nested with and without ranges.
Click here to view this example in a 3D scene window.
This example interpolates from red to green to blue in a 10 second cycle:
#X3D V3.0 utf8
PROFILE "Full"
META "filename" "ColorInterpolator.wrl"

DEF myColor ColorInterpolator {
  keyValue [ 1 0 0, 0 1 0, 0 0 1, 1 0 0 ]
  key [ 0.0 0.333 0.666 1.0 ]
}
DEF myClock TimeSensor {
  cycleInterval 10.0
  loop TRUE
}
Shape {
  geometry Sphere { }
  appearance Appearance {
    material DEF myMaterial Material { }
  }
}
ROUTE myClock.fraction_changed TO myColor.set_fraction
ROUTE myColor.value_changed TO myMaterial.diffuseColor
Click here to view this example in a 3D scene window.
The TimeSensor is very flexible. The following are some of the many ways in which it can be used:
The first example animates a box when the user clicks on it:
#X3D V3.0 utf8
PROFILE "Full"
META "filename" "ClickToAnimate.wrl"

DEF XForm Transform {
  children [
    Shape {
      geometry Box { }
      appearance Appearance {
	material Material { diffuseColor 1.0 0.0 0.0 }
      }
    }
    DEF Clicker TouchSensor {
    }
    DEF TimeSource TimeSensor {
      cycleInterval 2.0
    }
    DEF Animation OrientationInterpolator {
      keyValue [ 0.0 1.0 0.0 0.0, 0.0 1.0 0.0 2.1,
                 0.0 1.0 0.0 4.2, 0.0 1.0 0.0 0.0 ]
      key [ 0.0 0.33 0.66 1.0 ]
    }
  ]
}
ROUTE Clicker.touchTime TO TimeSource.startTime
ROUTE TimeSource.fraction_changed TO Animation.set_fraction
ROUTE Animation.value_changed TO XForm.rotation
Click here to view this example in a 3D scene window.
The second example plays chimes once an hour:
#X3D V3.0 utf8
PROFILE "Full"
META "filename" "AlarmClock.wrl"

Group {
  children [
    DEF Hour TimeSensor {
      cycleInterval 5.0
      loop TRUE
    }
    Sound {
      source DEF Sounder AudioClip {
	description "chime"
	url [ "click.wav" ]
      }
    }
  ]
}
ROUTE Hour.cycleTime TO Sounder.startTime
Click here to view this example in a 3D scene window.
Shuttles and pendulums are great building blocks for composing interesting animations. This shuttle translates its children back and forth along the X axis, from -1 to 1 (by default). The distance field can be used to change this default. The pendulum rotates its children about the Z axis, from 0 to 3.14159 radians and back again (by default). The maxAngle field can be used to change this default.
#X3D V3.0 utf8
PROFILE "Full"
META "filename" "ShuttlesAndPendulums.wrl"

PROTO Shuttle [
 field        SFTime  rate      1
 field        SFFloat distance  1
 field        MFNode  children  [ ]
 exposedField SFTime  startTime 0
 exposedField SFTime  stopTime  0
 field        SFBool  loop      TRUE
] {
  DEF F Transform { children IS children }
  DEF T TimeSensor {
    cycleInterval IS rate
    startTime     IS startTime
    stopTime      IS stopTime
    loop          IS loop
  }
  DEF S Script {
    field    SFFloat distance IS distance
    eventOut MFVec3f position
    url "ecmascript:
    function initialize() {
        // constructor:setup interpolator,
      pos1 = new SFVec3f(-distance, 0, 0);
      pos2 = new SFVec3f(distance, 0, 0);
      position = new MFVec3f(pos1, pos2, pos1);
    }"
  }
  DEF I PositionInterpolator {
  key [ 0, 0.5, 1 ]
  keyValue [ -1 0 0, 1 0 0, -1 0 0 ]
  }
  ROUTE T.fraction_changed TO I.set_fraction
  ROUTE I.value_changed TO F.translation
  ROUTE S.position TO I.keyValue
}
PROTO Pendulum [
 field        SFTime  rate      1
 field        SFFloat maxAngle  3.14159
 field        MFNode  children  [ ]
 exposedField SFTime  startTime 0
 exposedField SFTime  stopTime  0
 field        SFBool  loop      TRUE
] {
  DEF FF Transform { children IS children }
  DEF TT TimeSensor {
    cycleInterval IS rate
    startTime IS startTime
    stopTime IS stopTime
    loop IS loop
  }
  DEF SS Script {
    field SFFloat maxAngle IS maxAngle
    eventOut MFRotation rotation
    url "ecmascript:
    function initialize() {
      // constructor:setup interpolator,
      rot1 = new SFRotation(0, 0, 1, 0);
      rot2 = new SFRotation(0, 0, 1, maxAngle/2);
      rot3 = new SFRotation(0, 0, 1, maxAngle);
      rotation = new MFRotation(rot1, rot2, rot3, rot2, rot1);
    }"
  }
  DEF II OrientationInterpolator {
    key [ 0, 0.25, 0.5, 0.75, 1 ]
    keyValue [ 0 0 1 0,
               0 0 1 1.57,
               0 0 1 3.14,
               0 0 1 1.57,
               0 0 1 0 ]
  }
  ROUTE TT.fraction_changed TO II.set_fraction
  ROUTE II.value_changed TO FF.rotation
  ROUTE SS.rotation TO II.keyValue
}
Transform { translation -3 0 0
  children Pendulum { rate 3 maxAngle 6.28
    children Shape {
      geometry Cylinder { height 5 }
      appearance Appearance {
	material Material { diffuseColor 0.8 0.1 0 }
      }
    }
  }
}
Transform {
  children Shuttle { rate 2
    children Shape {
      geometry Sphere { }
      appearance Appearance {
        material Material { diffuseColor 0.1 0.8 0 }
      }
    }
  }
}
Click here to view this example in a 3D scene window.
These nodes can be used to do a continuous animation when loop is TRUE. When loop is FALSE they can perform a single cycle under control of the startTime and stopTime fields. The rate field controls the speed of the animation. The children field holds the children to be animateB.
This example is a simple implementation of a robot. This robot has very simple body parts: a cube for his head, a sphere for his body and cylinders for arms (he hovers so he has no feet!). He is something of a sentry--he walks forward and walks back across a path. He does this whenever the viewer is near. This makes use of B.14, Shuttles and pendulums.
#X3D V3.0 utf8
PROFILE "Full"
META "filename" "Robot.wrl"

EXTERNPROTO Shuttle [
  field        SFTime  rate
  field        SFFloat distance
  field        MFNode  children
  exposedField SFTime  startTime
  exposedField SFTime  stopTime
  field        SFBool  loop
]
"ShuttlesAndPendulums.wrl#Shuttle"

EXTERNPROTO Pendulum [
  field        SFTime  rate
  field        SFFloat maxAngle
  field        MFNode  children
  exposedField SFTime  startTime
  exposedField SFTime  stopTime
  field        SFBool  loop
]
"ShuttlesAndPendulums.wrl#Pendulum"

Viewpoint { description "Watch Robot"
  position 0 0 150
}

DEF Near ProximitySensor { size 200 200 200 }

DEF Walk Shuttle { stopTime 1 rate 10 distance 20
  children [ # The Robot
    Transform { rotation 0 1 0 1.57
      children [
        Shape {
          appearance DEF A Appearance {
            material Material { diffuseColor 0 0.5 0.7 }
          }
          geometry Box { } # head
        }
        Transform { scale 1 5 1 translation 0 -5 0
          children Shape {    # body
            appearance USE A
            geometry Sphere { }
          }
        }
        Transform { rotation 0 1 0 1.57 translation 1.5 0 0
          children DEF Arm Pendulum {
            stopTime 1 rate 1 maxAngle 0.52 # 30 degrees
            children [
              Transform { translation 0 -3 0
                children Shape {
                  appearance USE A
                  geometry Cylinder {  height 4 radius 0.5 }
                }
              }
            ]
          }
        }
        # duplicate arm on other side and flip so
        # it swings in opposition
        Transform { rotation 0 -1 0 1.57 translation -1.5 0 0
          children USE Arm
        }
      ]
    }
  ]
}
ROUTE Near.enterTime TO Walk.startTime
ROUTE Near.enterTime TO Arm.startTime
ROUTE Near.exitTime TO Walk.stopTime
ROUTE Near.exitTime TO Arm.stopTime
Click here to view this example in a 3D scene window.
Move closer to the robot to start the animation.
This example of a helicopter demonstrates how to do simple animation triggered by a TouchSensor. It uses an EXTERNPROTO to include a Rotor node from the Internet which does the actual animation.
#X3D V3.0 utf8
PROFILE "Full"
META "filename" "Chopper.wrl"

EXTERNPROTO Rotor [
  # nodeType Transform
  field SFTime rate
  field MFNode children
  exposedField SFTime startTime
  exposedField SFTime stopTime
][
  "Rotor.wrl"
]
PROTO Chopper [
  field SFTime rotorSpeed 1
] {
  Group {
    children [
      DEF Touch TouchSensor {
      }
      Inline {
        url [ "ChopperBody.wrl" ]
      }
      DEF Top Rotor {
        stopTime 1
        rate IS rotorSpeed
        children Inline { url [ "ChopperRotor.wrl" ] }
      }
    ]
  }
  DEF RotorScript Script {
    eventIn SFTime startOrStopEngine
    eventOut SFTime startEngine
    eventOut SFTime stopEngine
    field SFBool engineStarted FALSE
    url [ "ecmascript:
    function startOrStopEngine(value) {
      // start or stop engine:
      if (!engineStarted) {
        startEngine = value; engineStarted = TRUE;
      }
      else {
        stopEngine = value; engineStarted = FALSE; }
      }
      " ]
  }
  ROUTE Touch.touchTime TO RotorScript.startOrStopEngine
  ROUTE RotorScript.startEngine TO Top.startTime
  ROUTE RotorScript.stopEngine TO Top.stopTime
}
Viewpoint {
  description "Example16"
  position 0 0 5
}
NavigationInfo {
  type [ "EXAMINE" "ANY" ]
}
Group {
  children [
    DEF MikesChopper Chopper {
    }
  ]
}
Click here to view this example in a 3D scene window.
VRML provides control of the viewer's camera through use of a script. This is useful for things such as guided tours, merry-go-round rides, and transportation devices such as buses and elevators. These next two examples show a couple of ways to use this feature.
This example is a simple guided tour through the worlB. Upon entry, a guide orb hovers in front of the viewer. Click on this and a tour through the world begins. The orb follows the user around on his tour. A ProximitySensor ensures that the tour is started only if the user is close to the initial starting point. Note that this is done without scripts thanks to the touchTime output of the TouchSensor.
#X3D V3.0 utf8
PROFILE "Full"
META "filename" "GuidedTour.wrl"

Group {
  children [
    Transform { translation 0.0 -1.0 0.0
      children [
        Shape {
          geometry Box { size 30.0 0.2 30.0 }
          appearance Appearance {
            material Material { }
          }
        }
      ]
    }
    Transform { translation -1.0 0.0 0.0
      children [
        Shape {
          geometry Cone { }
          appearance Appearance {
            material Material {
              diffuseColor 0.5 0.8 0.0
            }
          }
        }
      ]
    }
    Transform { translation 1.0 0.0 0.0
      children [
        Shape {
          geometry Cylinder { }
          appearance Appearance {
            material Material { diffuseColor 0.0 0.2 0.7
            }
          }
        }
      ]
    }
    DEF GuideTransform Transform {
      children [
	DEF TourGuide Viewpoint { description "Tour Guide"
          jump FALSE
        }
       DEF ProxSensor ProximitySensor {
         size 50.0 50.0 50.0
        }
        DEF StartTour TouchSensor {
        }
        Transform { translation 0.6 0.4 8.0
          children [
            Shape {
              geometry Sphere { radius 0.2 }
              appearance Appearance {
                material Material { diffuseColor 1.0 0.6 0.0 }
	      }
	    }
	  ]
	}
      ]
    }
  ]
}
DEF GuidePI PositionInterpolator {
  keyValue [ 0.0 0.0 0.0, 0.0 0.0 -5.0, 2.0 0.0 -5.0,
             2.0 6.0 -15.0, -4.0 6.0 -15.0, -4.0 0.0 -5.0,
             0.0 0.0 -5.0, 0.0 0.0 0.0 ]
  key [ 0.0 0.2 0.3 0.5 0.6 0.8 0.9 1.0 ]
}
DEF GuideRI OrientationInterpolator {
  keyValue [ 0.0 1.0 0.0 0.0, 0.0 1.0 0.0 0.0, 0.0 1.0 0.0 1.2,
             0.0 1.0 0.0 3.0, 0.0 1.0 0.0 3.5, 0.0 1.0 0.0 5.0,
             0.0 1.0 0.0 0.0, 0.0 1.0 0.0 0.0 ]
  key [ 0.0 0.2 0.3 0.5 0.6 0.8 0.9 1.0 ]
}
DEF TS TimeSensor {
  cycleInterval 30.0
}
ROUTE ProxSensor.isActive TO StartTour.enabled
ROUTE StartTour.touchTime TO TS.startTime
ROUTE TS.isActive TO TourGuide.set_bind
ROUTE TS.fraction_changed TO GuidePI.set_fraction
ROUTE TS.fraction_changed TO GuideRI.set_fraction
ROUTE GuidePI.value_changed TO GuideTransform.translation
ROUTE GuideRI.value_changed TO GuideTransform.rotation
Click here to view this example in a 3D scene window.
This is another example of animating the camera by depicting an elevator to ease access to a multi-storey building. For this example, a 2 storey building is shown and it is assumed that the elevator is already at the ground floor. To go up, the user just steps onto the elevator platform. A ProximitySensor fires and starts the elevator up automatically. Additional features such as call buttons for outside the elevator, elevator doors, and floor selector buttons could be added to make the elevator easier to use.
#X3D V3.0 utf8
PROFILE "Full"
META "filename" "Elevator.wrl"

Transform { translation 0.0 0.0 -3.5
  children [
    Shape {
      geometry Cone { }
      appearance Appearance {
	material Material { diffuseColor 0.0 1.0 0.0 }
      }
    }
  ]
}
Transform { translation 0.0 4.0 -3.5
  children [
    Shape {
      geometry Cone { }
      appearance Appearance {
        material Material { diffuseColor 1.0 0.0 0.0 }
      }
    }
  ]
}
Transform {
  translation 0.0 8.0 -3.5
  children [
    Shape {
      geometry Cone { }
      appearance Appearance {
        material Material { diffuseColor 0.0 0.0 1.0 }
      }
    }
  ]
}
Group {
  children [
    DEF ETransform Transform {
      children [
        DEF EViewpoint Viewpoint { description "Elevator Viewpoint"
          jump FALSE
        }
        DEF EProximity ProximitySensor {
          size 2.0 5.0 5.0
        }
        Transform { translation 0.0 -1.0 0.0
          children [
            Shape {
              geometry Box { size 2.0 0.2 5.0 }
              appearance Appearance {
                material Material { }
              }
            }
          ]
        }
      ]
    }
  ]
}
DEF ElevatorPI PositionInterpolator {
  keyValue [ 0.0 0.0 0.0, 0.0 8.0 0.0 ]
  key [ 0.0 1.0 ]
}
DEF TS TimeSensor {
  cycleInterval 10.0
}
ROUTE EProximity.enterTime TO TS.startTime
ROUTE TS.isActive TO EViewpoint.set_bind
ROUTE TS.fraction_changed TO ElevatorPI.set_fraction
ROUTE ElevatorPI.value_changed TO ETransform.translation
Click here to view this example in a 3D scene window.
This example illustrates the execution model example described in 4.10.3, Execution model.
VRML V3.0 utf8
PROFILE "Full"
META "filename" "ExecutionModel.wrl"

DEF TS TouchSensor {
}
DEF Script1 Script {
  eventIn SFTime touchTime
  eventOut SFBool toScript2
  eventOut SFBool toScript3
  eventOut SFString string
  url [ "ecmascript:
  function touchTime() {
    toScript2 = TRUE;
  }
  function eventsProcessed() {
    string = 'Script1.eventsProcessed';
    toScript3 = TRUE;
  }
  " ]
}
DEF Script2 Script {
  eventIn SFBool fromScript1
  eventOut SFBool toScript4
  eventOut SFString string
  url [ "ecmascript:
  function fromScript1() {
  }
  function eventsProcessed() {
    string = 'Script2.eventsProcessed';
    toScript4 = TRUE;
  }
  " ]
}
DEF Script3 Script {
  eventIn SFBool fromScript1
  eventOut SFBool toScript5
  eventOut SFBool toScript6
  eventOut SFString string
  url [ "ecmascript:
  function fromScript1() {
    toScript5 = TRUE;
  }
  function eventsProcessed() {
    string = 'Script3.eventsProcessed';
    toScript6 = TRUE;
  }
  " ]
}
DEF Script4 Script {
  eventIn SFBool fromScript2
  url [ "ecmascript:
  function fromScript2() {
  }
  " ]
}
DEF Script5 Script {
  eventIn SFBool fromScript3
  url [ "ecmascript:
  function fromScript3() {
  }
  " ]
}
DEF Script6 Script {
  eventIn SFBool fromScript3
  eventOut SFBool toScript7
  eventOut SFString string
  url [ "ecmascript:
  function fromScript3() {
    toScript7 = TRUE;
  }
  function eventsProcessed() {
    string = 'Script6.eventsProcessed';
  }
  " ]
}
DEF Script7 Script {
  eventIn SFBool fromScript6
  url [ "ecmascript:
  function fromScript6 () {
  }
  " ]
}
# Display the results
DEF Collector Script {
  eventOut MFString string
  eventIn SFString fromString
  url [ "ecmascript:
  function initialize() {
    string[ 0 ] = 'Event Sequence:';
  }
  function fromString(s) {
    i = string.length; string[ i ] = ''+i+') '+s+' occurred';
  }
  " ]
}
Transform {
  translation 0 2 0
  children [
    Shape {
      appearance Appearance {
        material Material {
          diffuseColor 0 0.6 0
        }
      }
      geometry Sphere {
      }
    }
  ]
}
Shape {
  geometry DEF Result Text {
  }
}
Viewpoint { position 7 -1 18 }

ROUTE TS.touchTime TO Script1.touchTime
ROUTE Script1.toScript2 TO Script2.fromScript1
ROUTE Script1.toScript3 TO Script3.fromScript1
ROUTE Script2.toScript4 TO Script4.fromScript2
ROUTE Script3.toScript5 TO Script5.fromScript3
ROUTE Script3.toScript6 TO Script6.fromScript3
ROUTE Script6.toScript7 TO Script7.fromScript6
ROUTE Script1.string TO Collector.fromString
ROUTE Script2.string TO Collector.fromString
ROUTE Script3.string TO Collector.fromString
ROUTE Script6.string TO Collector.fromString
ROUTE Collector.string TO Result.string
Click here to view this example in a 3D scene window.
Clicking on the green sphere should display a text string for each eventsProcessed event. The two possible correct displays for this example are:
Event Sequence:
  1) Script1.eventsProcessed occurred
  2) Script2.eventsProcessed occurred
  3) Script3.eventsProcessed occurred
  4) Script6.eventsProcessed occurred
or
Event Sequence:
  1) Script2.eventsProcessed occurred
  2) Script1.eventsProcessed occurred
  3) Script3.eventsProcessed occurred
  4) Script6.eventsProcessed occurred